Support Knowledgebase
General
How does a Bluetooth remote control work?
Most Bluetooth remote controls use Bluetooth Low Energy (BLE) and the HID over GATT profile.
We have put together an overview of how they work and some details of how we simulate this with the RedRat BT module.
Error message: (Code = 32) Initial signal pulse not long enough to measure carrier frequency
This could happen when capturing/learning an IR signal from a remote control handset in the Signal DB Utility. It’s an indication that the initial pulse of the IR signal is quite short, so not long enough for the RedRat to measure the carrier frequency using its default settings. What the RedRat tries to do is measure the carrier frequency of the IR signal in this first pulse of IR by counting 8 cycles of the IR carrier wave. If the pulse is short, it may not have sufficient cycles of the carrier wave, so the RedRat generates this error message.
To solve this, the number of cycles that the RedRat measures can be reduced. Using the Signal DB Utility, go to the View -> Signal Capture Parameters menu item. In the dialog, change the ‘Mod. Freq. Periods to Count’, to ‘4’ and see whether that helps. If you still get the problem, then reduce further to ‘2’ and then ‘1’. If this does not allow you to capture the IR signal, then it may mean that the measurement of the carrier frequency is not quite as accurate, but this can be manually adjusted later if necessary.
Error message when trying to learn a signal: (Code = 33) Not Enough length values allocated for signal
Reliable IR Control
Infrared remote control is basically a “fire and forget” mechanism, by which we mean that there is no feedback from the STB/TV that it has received the IR signal. A human user of a remote control will notice that the STB hasn’t responded and simply press the remote’s button again, but of course this doesn’t work with automated test environments.
So here are a few points to consider to try and get reliable IR control from RedRat hardware:
1. Positioning of the IR Emitter
This mainly applies to the stick-on emitters used by the irNetBox. They should be placed directly over the IR detector inside the front of the STB/TV. If it is difficult to work out exactly where this is, then shining a torch through the front cover may illuminate the inside enough to see the detector. If not, try repeatedly outputting an IR signal, then slowly move the emitter around to find the best location.
2. Preventing Interference
Both sunlight and artificial light can contain significant amounts of energy in the infrared part of the spectrum. While normal IR remote control protocols have been designed to cope with other incident IR, this only goes so far, and so background light can impact the reliability of IR signal transmission. Reducing background light and making sure no light directly hits the front of the STB or TV can improve IR control.
3. Getting the Right IR Output Power
The USB RedRat3-II device is an IR blaster and so designed for high-power, non-selective IR output. On the other hand, the irNetBox is designed for individual control of multiple STBs via stick-on IR emitters. The RedRat-X has both options. A balance has to be found between 1) increased IR output power to improve IR control reliability and 2) reduced power to prevent “IR leakage” to adjacent STBs.
The irNetBox-III/IV has 100 different IR output power levels, so quite fine control is available. The level corresponds very approximately to the milliamps through the IR emitter, though this is IR LED dependent. The default output power level for each port on an irNetBox is around 33% of maximum, i.e. around 30mA.
Please note: If using high-power IR LEDs (not those provided by RedRat Ltd), then power levels above 60% could cause damage to the IR LED driver chip in an irNetBox-III. Please contact RedRat support if you have any questions about this.
4. Accurate IR Signal Data
While RedRat devices do accurately record IR signals on the whole, inaccuracies in data may cause the STB to not respond as reliably as anticipated. Some STBs are also very sensitive to small variations in the IR signal.
If you suspect that the accuracy of the IR data itself may be an issue, then try capturing the data again, ideally with a USB RedRat3-II or RedRat-X device, shaded from incident light. Work signal by signal and test the first few directly after capture to check if it has worked ok.
At RedRat HQ we also offer a free service of capturing any awkward IR datasets, which we then verify using a scope, comparing the RCU’s output with the RedRat device and then making any adjustments necessary to make them effectively identical.
RedRat Devices and LabView
A number of RedRat customers use RedRat devices with LabView. A couple of users have been good enough to share their setup with us, which can be found on our LabView page.
Updating RedRat Device Firmware
Device firmware is updated via the RedRat Device Manager.
To install firmware that is available from our website, the steps are as follows:
- Download, install and launch the RedRat Device Manager.
- Ensure it can download firmware updates from the website by clicking on File → Options and then set the ‘URL’ option as the source for firmware updates.
- Open the device’s ‘Hardware/Firmware Info’ window via Devices → Hardware/Firmware Info or by right or middle clicking on the selected device.
- Click the ‘Check for Updates’ button to bring up the ‘Firmware Management’ window.
- Now you can select the firmware version you wish to install.
irNetBox
Differences between the different irNetBox versions
The first versions of the device - the irNetBox-I and irNetBox-II - were fairly simple, only being able to generate one IR signal at a time. This lead to bottlenecks when attempting to rapidly control banks of STBs, so the irNetBox-III was developed. The MK-III is based on the XMOS quad-core XS1-G4, delivering up to 1600MIPS and capable of generating 16 different IR signals at the same time. Each core can run multiple threads in a deterministic way, so allowing allocation of a guaranteed amount of processing power for signal generation on each IR output port, giving a throughput of greater than 80 IR signals per second (dependent on the IR signal type).
In addition to being able to output 16 different IR signals simultaneously, the other main changes between irNetBox-I/II & irNetBox-III are:
- Each output has 100 different power levels, in the approximate range of 0 to 100mA IR LED drive current.
- Includes built in hardware for self-test functionality.
- IR emitters can also be connected via a 25-way D-type connector rather than jack sockets if using in a custom wiring harnesses.
In 2016 we released the irNetBox IV, following a complete redesign and incorporating many new features:
- Uses two XMOS XS1-L16A chips, giving a total of 2000 MIPS.
- An OLED display and navigation panel which simplify the installation and management of the device and can provide operational feedback.
- PoE (Power over Ethernet) to allow the device to be connected for network and power with just one lead (router/switch must be PoE compatible).
- Can be configured via its web interface.
- IR output ports can be used in current drive mode (default and standard for IR LEDs) or voltage drive mode (for interfacing to IR distribution systems).
- Real Time Clock which enables autonomous testing functionality directly from the device itself (when firmware ready).
Note: The 25-way D-type connector has been removed on standard production units, but can be added on request.
Our software Controls the irNetBox directly via TCP/IP, so what changes are needed for the irNetBox-III and irNetBox-IV?
The irNetBox-III and IV support all the commands of previous versions, so your software should be able to control it with minimal (or no) changes. As this synchronous command set works in exactly the same way as before, there is no speed improvement when using it.
To use the power of the irNetBox-III and IV, an asynchronous command set has been developed which supports sending IR output commands in rapid succession while the box is busy working on previous commands.
The irNetBox-IV uses a different network interface, so its discovery on the network is slightly different to previous versions. It also has an extended command set to support new features, such as the front panel display.
For a detailed explanation, see the communication protocol documentation.
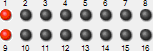
The red LEDs on the front of the irNetBox-III blink a lot. Why is this?
These are used to indicate various things to the user, ranging from the firmware version to which IR outputs are in use.
Bootloader Mode
The processor has booted into the factory bootloader firmware. The irNetBox-III will not be functional, but new firmware can be loaded via its network interface.
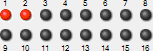
Firmware – V1.3.7
If the operating firmware version is 1.3.7, this pattern will continue to be shown until the irNetBox-III starts to be used.
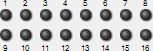
Firmware – V1.3.8 and higher
The firmware version is shown for 10 seconds following startup (or processor reset). Shown here is the pattern for firmware version 1.3.8.
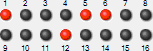
Idle (Cylon or Night Rider) Mode
Shown when the irNetBox-III is idle with no controlling software connected to it.
If the irNetBox-III has no lights illuminated, this indicates that an application is connected to the irNetBox-III. Each time it sends an IR signal to one of the ports, that red LED will flash to indicate this.
How does the irNetBox-III generate 16 different IR signals at the same time?
The design is based on the XMOS quad-core XS1-G4, which is capable of delivering up to 1600MIPS. Each core can run multiple threads in a deterministic way, so allowing allocation of a guaranteed amount of processing power to signal generation for each IR output port, however many ports are being used at any point in time.
Updated software for the XPort-05
- You are using RedRat applications, or
- You are using third party applications based on the RedRat SDK (or RedRat.dll).
- The RedRat SDK (RedRat.dll) – version 3.10 onwards.
- The IR Signal Database Utility – version 3.09 onwards.
- The IRNetBox Manager – version 3.04 onwards.
- RedRat Control – version 3.14 onwards.
- RedRat Scheduler – version 4.11 onwards.
- RedRat Hub – version 4.09 onwards.
- Virtual Remote – version 3.06 onwards.
Using an IP address to connect directly to an irNetBox-III
An irNetBox is usually discovered on a network using a specific UDP broadcast to which it replies providing information about how to connect to it. This is the default discovery mechanism for RedRat applications and the RedRat SDK.
There may be situations where this does not work, for example if UDP data packets are not routed between different subnets. In this case, you can assign your irNetBox a static IP address and then connect directly to it without needing to use the UDP discovery.
This can be done using the Lantronix Device Installer that is delivered on the CD with the irNetBox. It can also be downloaded from the Lantronix website.
Start the RedRat Device Manager, and instruct it to connect directly to the irNetBox via its IP address. This is done from the Devices -> Add (IP Address) menu item.
Once information about the irNetBox has been loaded and is shown on the RHS of the main window, change the setting of the Lookup Find Method from the default BROADCAST to IP_ADDRESS.
This information is stored locally on the PC, and all RedRat applications and the SDK will now use the IP address to directly connect to the irNetBox.
Can’t find an irNetBox on the network
If an irNetBox can’t be discovered on a network, there could be a number of reasons:
- It has been given a static IP address, and then moved to a different network where this address is no longer valid
- It has lost its IP configuration information
- There is a hardware error with the network module (the Lantronix XPort)
Assuming that it is point 1 or 2 above, the first thing to try is to see if its network settings can be reset so that it becomes visible on the network. The easiest way of doing this is using the RedRat Device Manager application.
Once the application has been installed and started, go to the Devices -> Set IP via MAC Address menu item. You will then need the last two bytes of the irNetBox’s MAC address, and so enter them here.
If you know the IP address you want to use for the box, then set it here. If not, then enter 0.0.0.0 and this will tell it to obtain an IP address automatically (assuming you have a DHCP server on your network).
If this command reaches the box, it will then reset and hopefully you can connect to it again. If not, then it could be some physical problem with the box, so maybe best to ship it back to us for repair.
Connecting to an irNetBox behind a NAT router
An irNetBox can be used when it is behind a NAT router as long as the necessary ports are configured to pass through TCP communication to the irNetBox.
The NAT Router has to be configured to forward the irNetBox TCP traffic from the external (public) network to the internal (private) network. The TCP ports which need to be forwarded to the irNetBox are:
- irNetBox-III or earlier: 10001, 30704 and 30718
- irNetBox-IV: 10001 and 30718
Once these ports have been setup, start the RedRat Device Manager on a computer on the outside of NAT Router and use the public IP address provided by the NAT Router. Details of using a specific IP address to find and communicate with an irNetBox can be found here.
RedRat 3
The RedRat Does Not Learn or Playback My IR Signals
If your RedRat device does not learn IR signals from your remote handset, or does not control your equipment (STB, TV etc.), then we try and work with you to get the problems resolved. There are a wide range of reasons why it may not be working, including:
- New types or flavours of IR signal
- Poor conditions for learning the IR signal (e.g. bright light)
- Signal capture parameters not set correctly for the type of IR signal
- Poor conditions for signal output/playback
- Hardware failure
To help resolve the problem, we need as much information as possible so that we can identify the cause and provide a fix. Please follow these steps, sending the answers and results to RedRat support.
- When you record IR signals from the remote handset, do you get any error messages?
- If you get an error, please send the message, or if you can capture the IR signals.
- If you can capture IR signals, then send the IR dataset XML file produced by the Signal DB Utility.
- When you are recording IR signals, do you have bright light (artificial or sunlight) shining on the RedRat? If yes, try shielding from light and going back to step 1.
- Are you using the most recent versions of RedRat software and firmware? Try using the most recent IR Signal DB Utility software version and update the firmware using the RedRat Device Manager. Then go back to step 1.
- If the RedRat does not control the STB (TV, DVD player etc.), check to ensure that there is not too much light falling on the STB.
- Test the RedRat with an IR signal dataset that you know works to validate that the RedRat hardware is performing correctly.
If you have gone through these steps and it still does not work, then please e-mail us the following:
- The IR dataset that does not work (if you have been able to capture it).
- The type of RedRat hardware, plus firmware version. This can be found when using the Signal Database Utility from the RedRats -> Find RedRats menu item. In the resulting dialog box, right-click on the RedRat, select Device Info and copy this into a mail.
- The Signal DB Utility version from the Help -> About menu item.
We are often able to find a solution with just this information. Where this isn't possible, we then ask for either for a remote control handset to be sent to us (for direct IR signal analysis) or the specification of the remote control signals so that we can generate the RedRat data from it.
Why does the RedRat3 have two IR detectors?
The two detectors are for different purposes:
Detector 1:
This is a wideband receiver for accurate sampling (or learning) of raw remote control signal data. It has a short range (only 1 to 2m), but the sampled data can then be used to create the signal dataset, which is used for signal output. Because it samples the raw IR data, it is used to measure the carrier frequency of the particular remote control handset.
Detector 2:
For applications where you want to control the PC with a remote control a standard, narrow-band, long-range remote control detector is used. It has a reception range of 10m or more with sufficient accuracy for signal recognition, but not for output. This detector only works with a single carrier frequency, and be default we put use 38KHz for the RedRat3-II. We can replace this detector with one for another frequency if needed, for example 36KHz, 40KHz or 56KHz.
Can I use multiple RedRat3(-II)s on a computer?
Multiple RedRat3s on Linux
On Linux versions with kernels <4.1 (e.g. most Ubuntu 14.X versions) , there could be a problem with more than one RedRat3 device, generating this error:
[ 5.920760] redrat3 2-1.8:1.0: Firmware rev: 1.07 (c) RedRat Ltd 2009
[ 5.924554] input: MCE IR Keyboard/Mouse (redrat3) as /devices/virtual/input/input5
[ 5.929248] rc rc0: lirc_dev: driver ir-lirc-codec (redrat3) registered at minor = 0
[ 5.932160] sysfs:
This is not actually an issue with the RedRat LIRC driver, but is elsewhere in the Linux code (LED Class Core). From kernel version 4.1, the LED Class Core has been updated to handle multiple LEDs with the same name.
For Ubuntu users, this is included in Ubuntu 15.10. If using Ubuntu 14.04, kernel updates can be applied as part of the LTS Hardware Enablement Stack to bring it up to kernel version 4.2.